
In part 1 of this posting “Flyback Inverter for
Fluorescent Lamp: Part 1, Making Repairs” a little careful and straightforward
troubleshooting and repair brought my friend’s fluorescent lamp assembly back
to life again. But a fluorescent lamp has quite a few unique requirements to
get it to start up and stay illuminated. How does this flyback converter manage
to do these things?
I had first looked around to see if I could find a
schematic for this fluorescent lamp assembly, but nothing turned up for me.
However, the parts count was low enough, and circuit board large enough, that
it was a fairly simple matter to trace out and sketch the inverter’s schematic
in fairly short order, as shown in Figure 1.
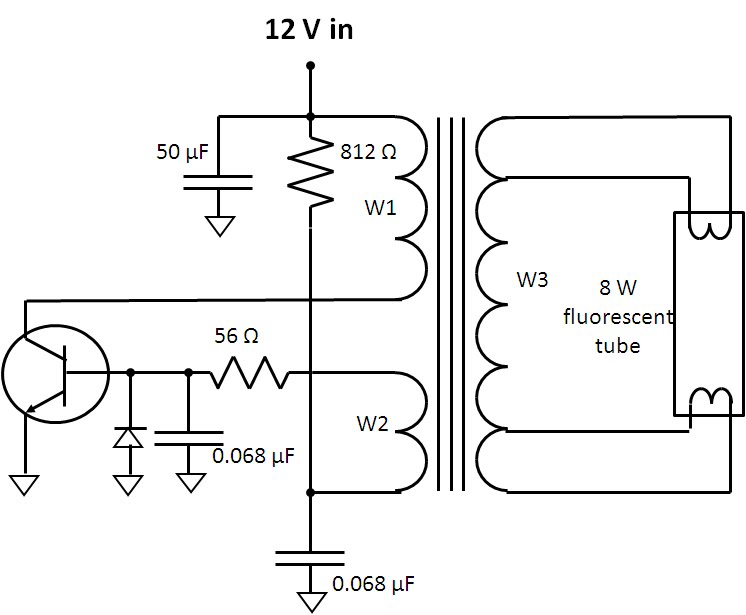
Figure 1: Fluorescent lamp single-ended flyback inverter
circuit
When first powered up the switching transistor is biased
on by the 812 ohm resistor, energizing transformer winding W1. This in turn
applies positive feedback to the transistor through winding W2, driving it into
saturation. There are two mechanisms in the flyback transformer that are
critical for making this inverter work:
- First it has a gapped core. This allows it to store a substantial amount of energy in its magnetic field which in turn gets dumped over to the fluorescent tube through the secondary winding W3 when the transistor turns off and the transformer’s magnetic field collapses. During this period the winding voltage continues to climb as the magnetic field collapses until the energy can find a place to discharge to, in this case into the fluorescent tube. The voltage is also further increased by the turns ratio of the transformer. This is the “flyback” effect that creates sufficiently high enough voltage to get the fluorescent tube to “strike” or ionize its gas to get it to start conducting and give off illumination, typically many hundreds of volts.
- As can be seen this inverter is a very simple circuit with a minimum of parts. A second mechanism in the transformer is it is designed to saturate in order to make the inverter oscillate. At the end of the transistor’s “on” period the transformer reaches its maximum magnetic flux at which point the transformer saturates. Winding voltage W2 drops to zero and then reverses driving the switching transistor into cutoff. After the magnetic field has collapsed and energy discharged to the fluorescent tube the process repeats itself.
The switching transistor’s collector and base voltages
during turn on are captured in the oscilloscope diagram shown in Figure 2.

Figure 2: Inverter switching transistor collector and
base voltage waveforms
A number of interesting things can be observed in Figure
2. The oscillation period is roughly 50
microseconds, or oscillation frequency of 20 kHz. It takes about 10 cycles, 500
microseconds, for the fluorescent tube to strike. During this initial phase the
peak collector voltage is flying up to nearly 100 volts or about 8 times the DC
input voltage being applied. Again, this voltage is being multiplied up by the
turns ratio of windings W1 and W2 to bring this up in the vicinity of 600 volts
or so needed to make the fluorescent tube to strike. Once the tube does strike
and starts conducting its impedance drops. This causes the collector voltage to
drop down to about 35 volts which is consistent with the proportion of drop in
voltage needed for the fluorescent tube once it’s gas is ionized and is
conducting. Note also the collector voltage pulse also widens as it takes a
longer time for the energy in the transformer to be dumped when it’s at a lower
voltage.
Although this inverter at first glance is a rather simple
and minimum viable, minimum parts count circuit, with careful design it can be
made to be very efficient. This is where the design of the transformer becomes
as much art as science, knowing how the subtle characteristics of the magnetic
material and inductive and capacitive parasitics can be used to advantage in
contributing to and improving the overall performance of the design.
Anyway, what my friend really cared about is the lamp now
works and he is able to put it to good use in his camper!
No comments:
Post a Comment
Note: Only a member of this blog may post a comment.